This is Part 4 of my blog on how I converted my MT4 EA to MT5. Part 3 can be found here, which explains how to prepare to convert a trading strategy into a MT5 EA. In this part I’ll tell you how I converted my trading strategy into a downloadable MT5 EA. You can download the MT5 EA as well (instructions on this page).
The tool to create EA’s
Now that I’ve got the strategy ready, all I need to do is put the result of my automation strategy (Part 3) into a working EA. The tool I’m going to be using to do this is EA Builder Pro (eabuilderpro.com). I chose this tool over others, because it has a free version and it’s very fast to setup an EA compared to other tools. Also, I have a good feeling about this company and they offered great help when I had questions in the past.
The way to create my EA very much fits the way I put my automation strategy into words, so you’ll notice I’m creating this EA using the same steps as the automation strategy.
Creating an account
If you’ll build this EA with me, I advise you to create an account when using the tool. It’s free and this way you’re sure your data doesn’t disappear. It just takes a few steps and an e-mail verification to setup your account.
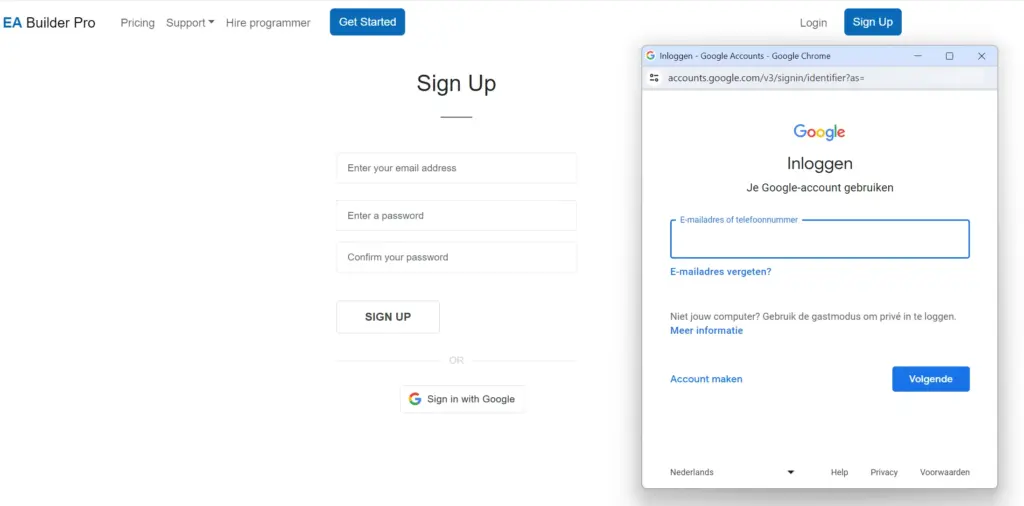
Sign Up
Adding an EA
One of the first things you’ll see when you access the tool is an option to add an EA, I went ahead and did just that.
I Made sure I chose a MT5 EA and chose their ‘Empty template’.
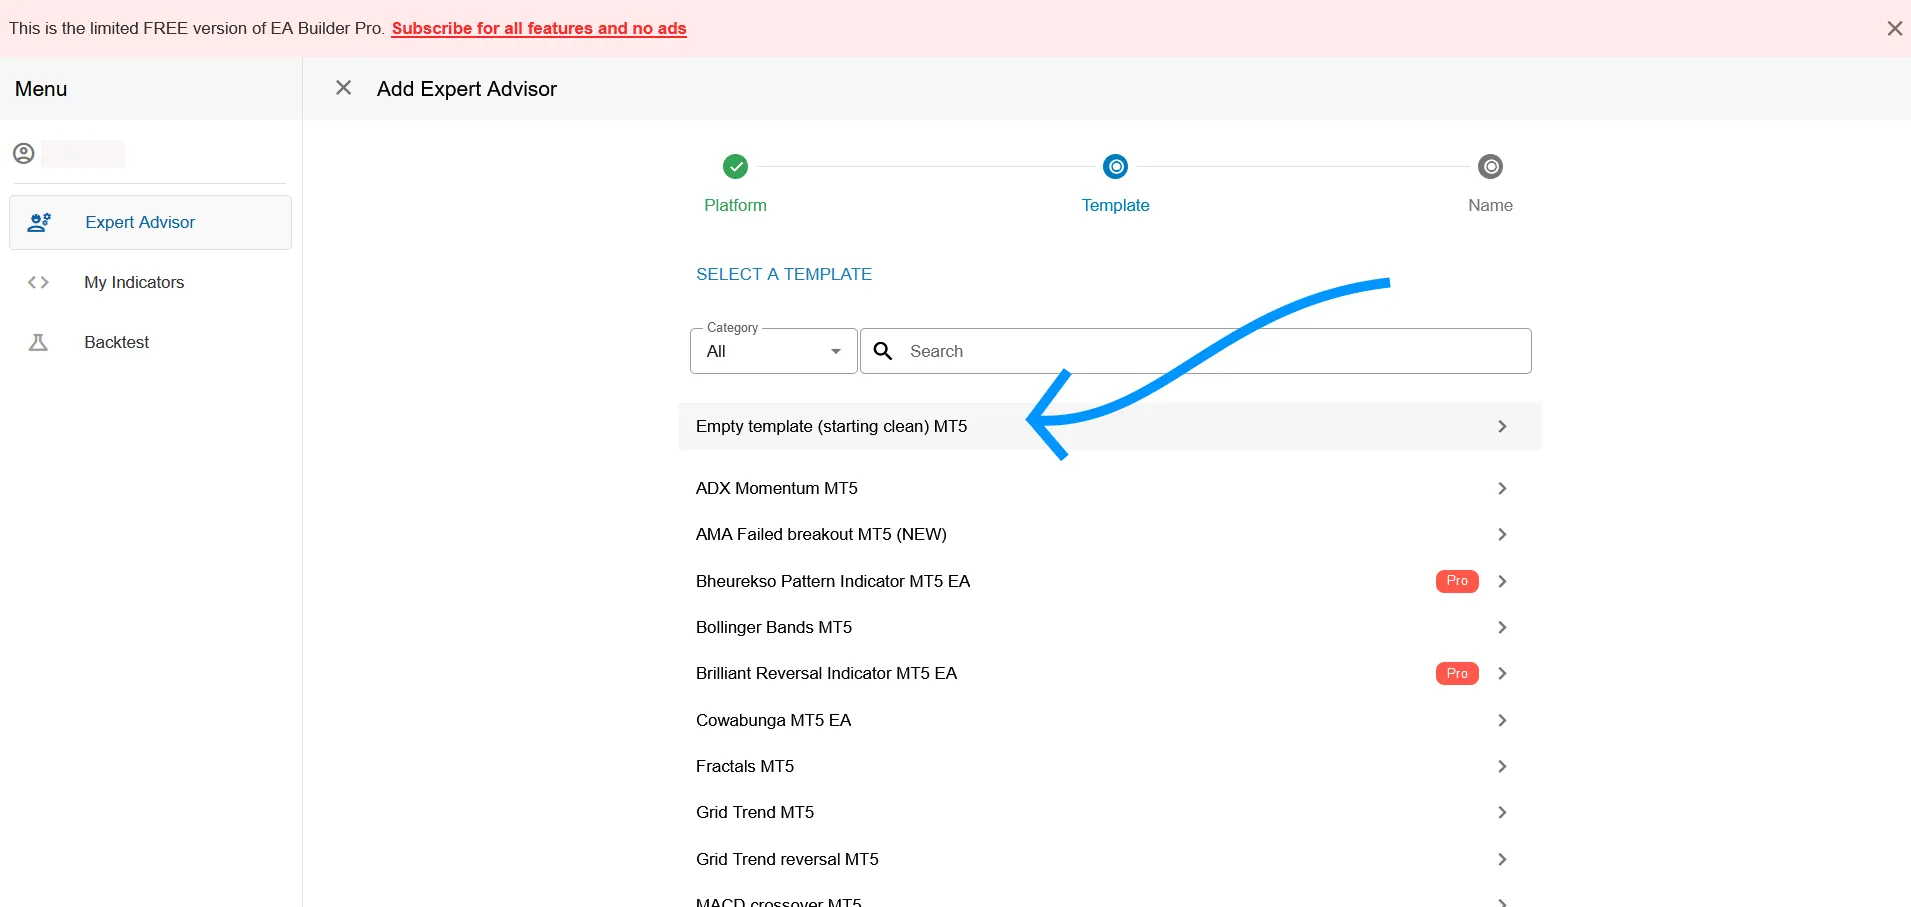
Choose the ‘Empty template’
Indicators (1/4)
After I added my EA, I can now add all indicators:
- Bar Close
- SMA 34 (set period to 34)
- Highest Lowest (you can download this indicator here: Highest Lowest.
When done adding all indicators to the list, my EA looked like this:
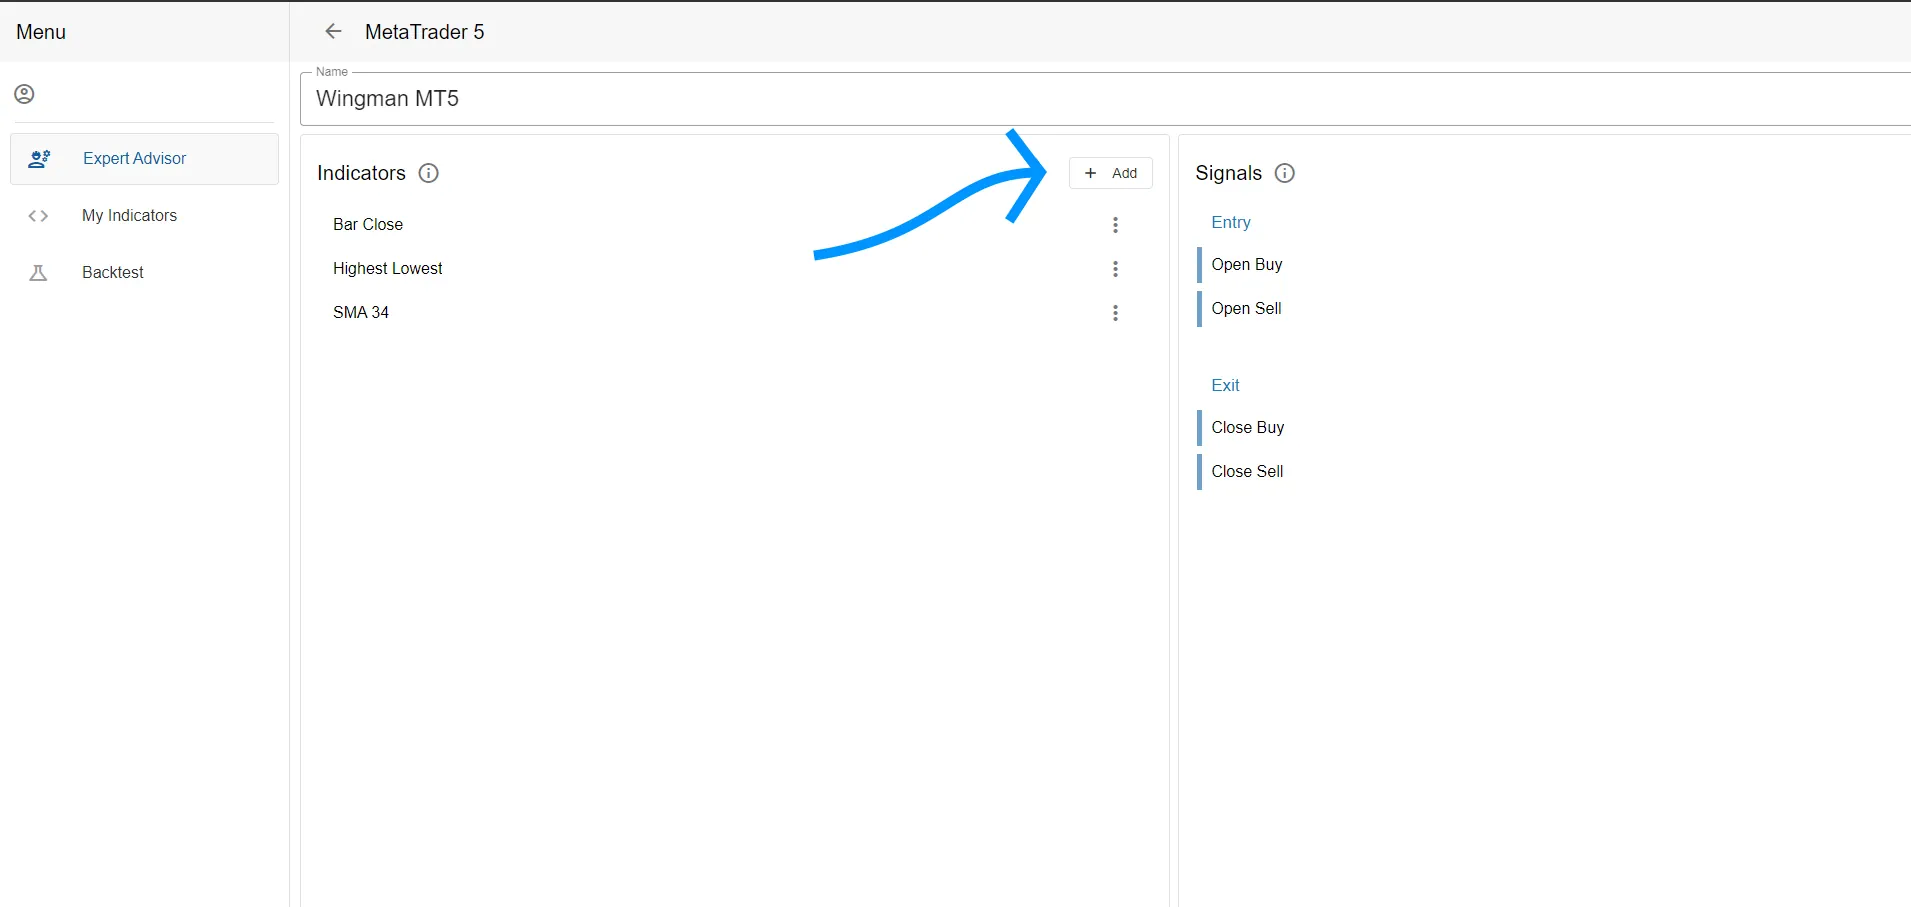
Click ‘Add’ to add indicators to your EA.
Opening trades (2/4)
I can now configure when to open a trade. I have to make a seperation of conditions for opening a buy order and a sell order. I edited the ‘Open Buy’ and the ‘Open Sell’ signals to do this.
I first created a condition for opening the initial order and then a secundary condition for opening the additional orders (remember rule #3 – let profits run and double down). Let’s enter the conditions for opening a buy trade, after which I will explain everything you see in the image:
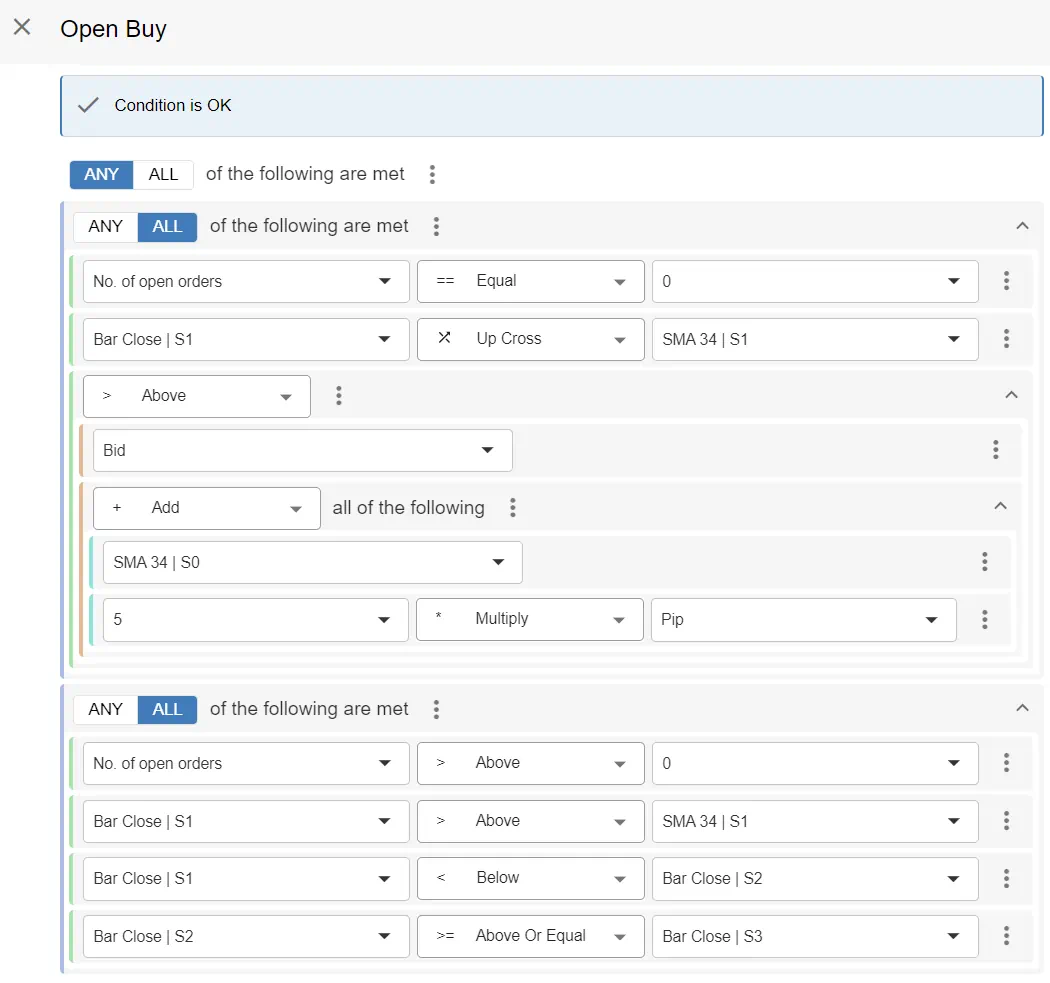
The signal for opening buy orders (both first order and addition orders.
Now I will first discuss the the first part of the Open Buy signal, opening the initial order which occurs after the trend starts in a new direction by passing the SMA 34 indicator line:
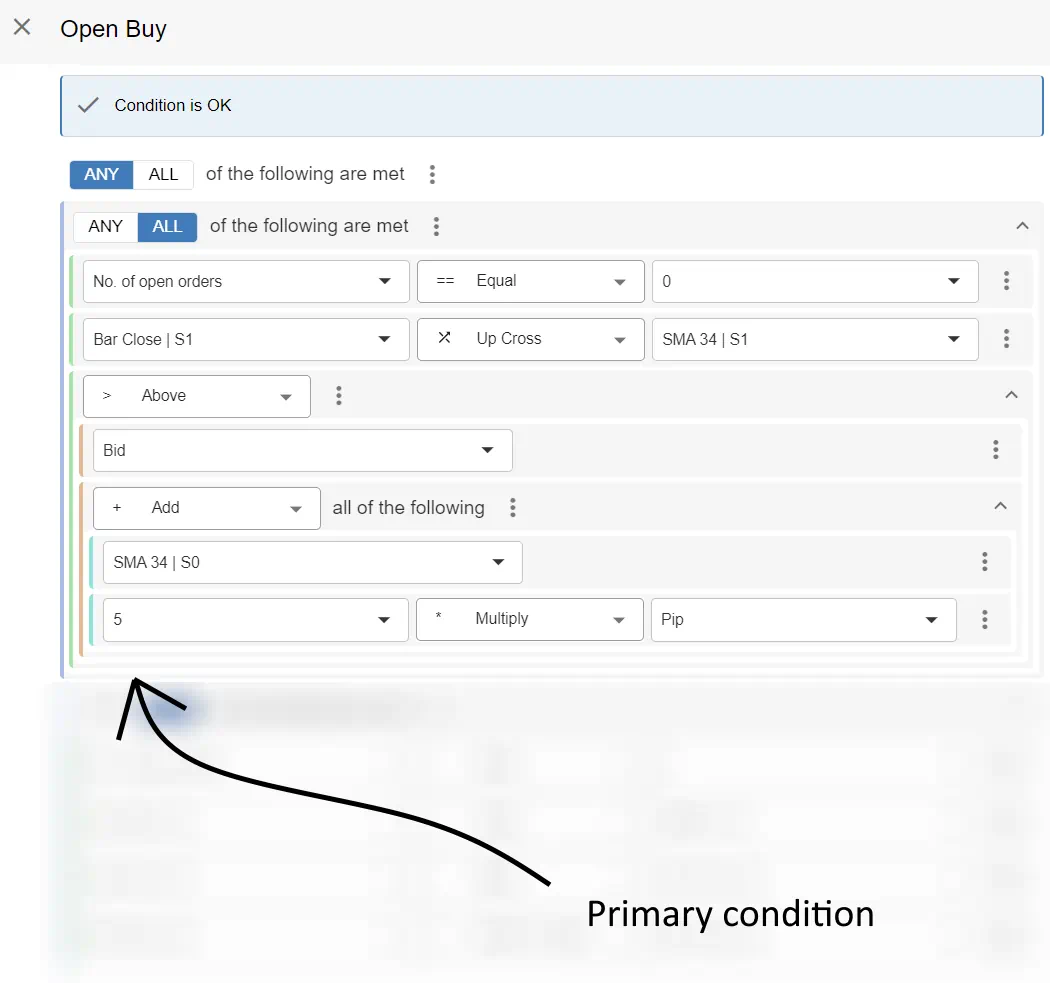
The signal for opening the first buy order.
Now let’s talk about this, line for line.
- What you see on line 1 is an ‘Or’. This means that there can be multiple conditions below it (children, as in a family tree) and if any of the children is true, an order will be opened. This makes sense, because we will create a condition for the 1st order and for additional orders.
- What you see below that on line 2 is an ‘And’. This means that there can be multiple children below it and that all children below the ‘And’ have to be true for an order to be opened. So for the 1st order to open the EA has to check all conditions below it and all conditions will have to be true.
- On line 3, you see a condition ‘No. of open orders Equals 0’. This means that this condition can only lead to opening a buy order if there are currently 0 orders opened. This is why this is the primary condition to open the first order, because we know there are currently 0 open orders.
- On line 4 you see ‘Bar Close (Shift 1) Cross Up SMA 34’. This means that this condition is only true if the previous Bar crossed (Shift 0 defines current bar, Shift 1 previous bar, etc) up the value of the ‘SMA 34’ indicator. So if the previous bar closed above SMA 34, then the bar before that (Shift 2) was still below the SMA 34 indicator. This is called a ‘cross up’ or ‘cross from below’.
- On line 5 you see that we created a complex logical structure. > means we’re checking if one child is bigger than the next child. In this case we check if (first child) Bid is bigger than > (second child) the SMA 34 indicator + 5 pips. We add 5 pips to the SMA 34 indicator to make sure the bar closed well clear of the SMA 34 indicator, so as a small form of confirmation that the price really crossed the SMA 34 indicator.
Now that I’ve discussed the primary open buy condition, which opens the first order, I’m also going to discuss the condition which opens the additional order(s).
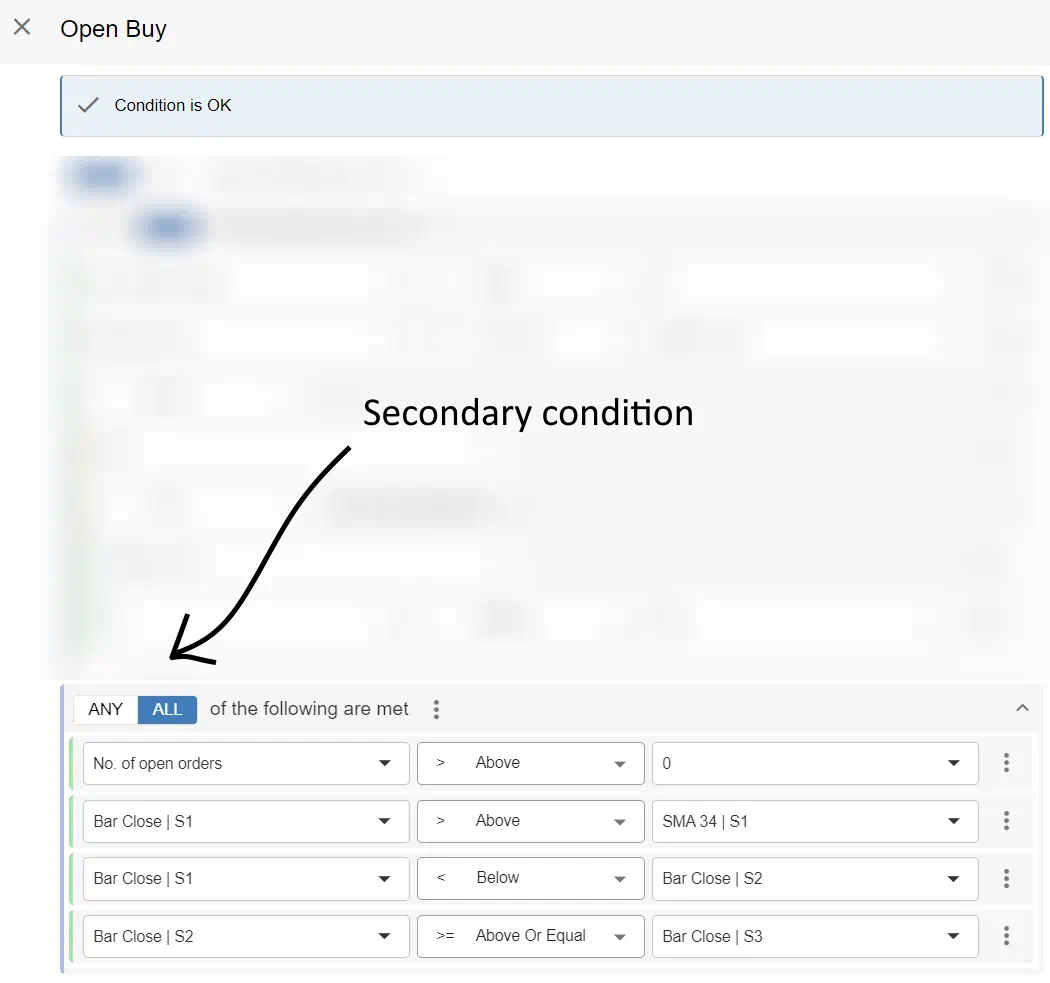
The signal for opening the additional buy order(s).
Again, I discuss them line by line.
- The first line again contains the ‘And’, which means that all children have to be true for the additional order(s) to be opened.
- Line 2 states that this condition is only true if there are currently more than (>) 0 orders opened. This makes sure that this condition will only cause additional orders to be opened, because at least 1 order is already opened.
- Line 3 checks if the previous bar closed above the SMA 34 indicator, to make sure I’m still in the trend up and the trend hasn’t reversed.
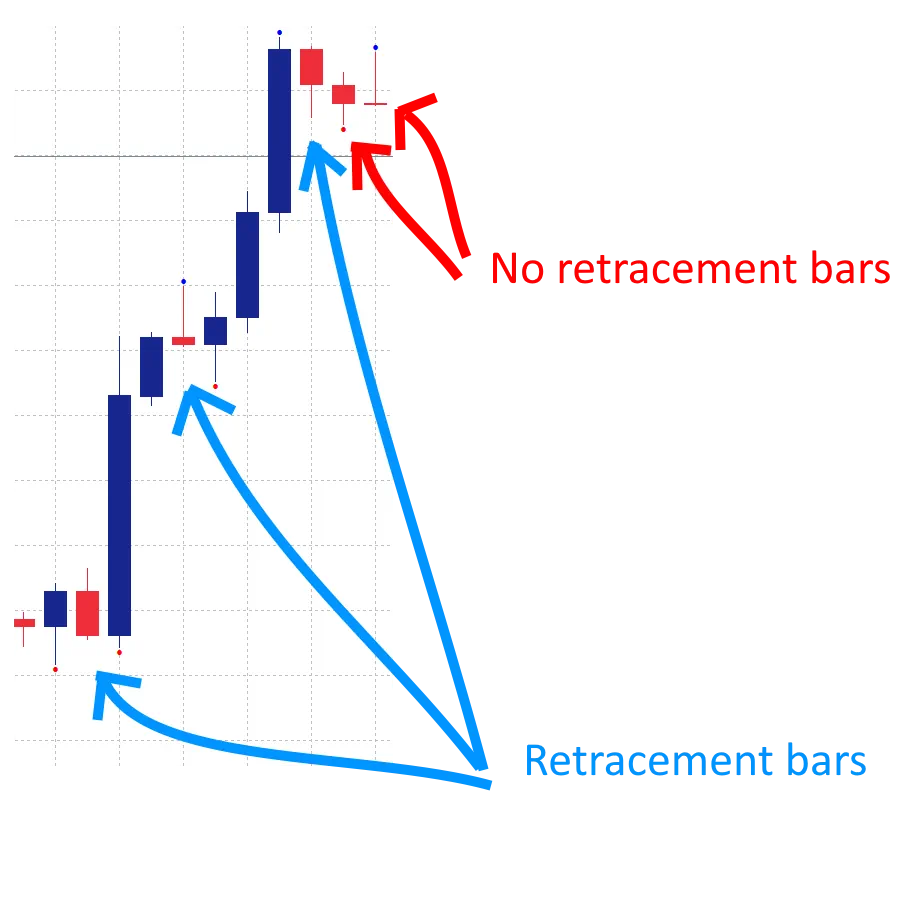
- Line 4 and 5 work together to check if a reversal candle has occured, because we want to open an additional order after a retracement. In this case we count a retracement as a bar which closed in the opposite direction, after a bar which went in the trend direction. So, Bar Close shift 1 (previous bar) retraced compared to shift 2 (3rd bar), but shift 2 didn’t retrace compared to shift 3 (4th bar).
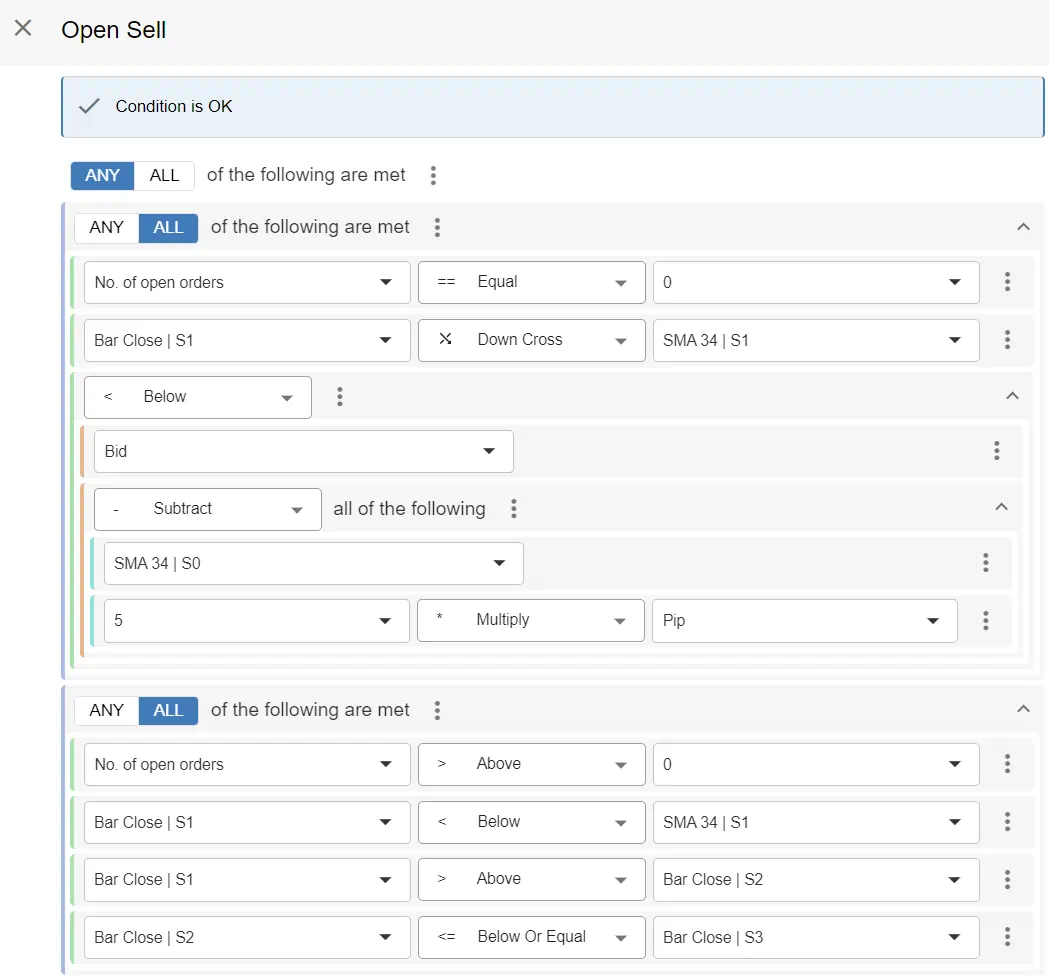
The signal for sell will be the same, but simply opposite, which is why I’ll add the signal here, but not describe it completely.
When not to open a trade (3/4)
I want to prevent the Open Buy/ Open Sell signal from opening a trade when there’s already an open order very close to the current price or another order. This can occur when the retracement candle is close to the previous retracement, or maybe even further down in price. So I only want to double down when the price is going my way, not against me, because this could undo the profit made by the first order(s), which currently are in profit.
EA Builder Pro supports this kind of preventing an order to open by offering modules which can be added to my EA. In this case I add a module from the ‘Prevent open’ category which is called ‘Pip gap between orders’. I configure the module to block orders if the price is not at least 5 pips away in the profit direction compared to the previous order
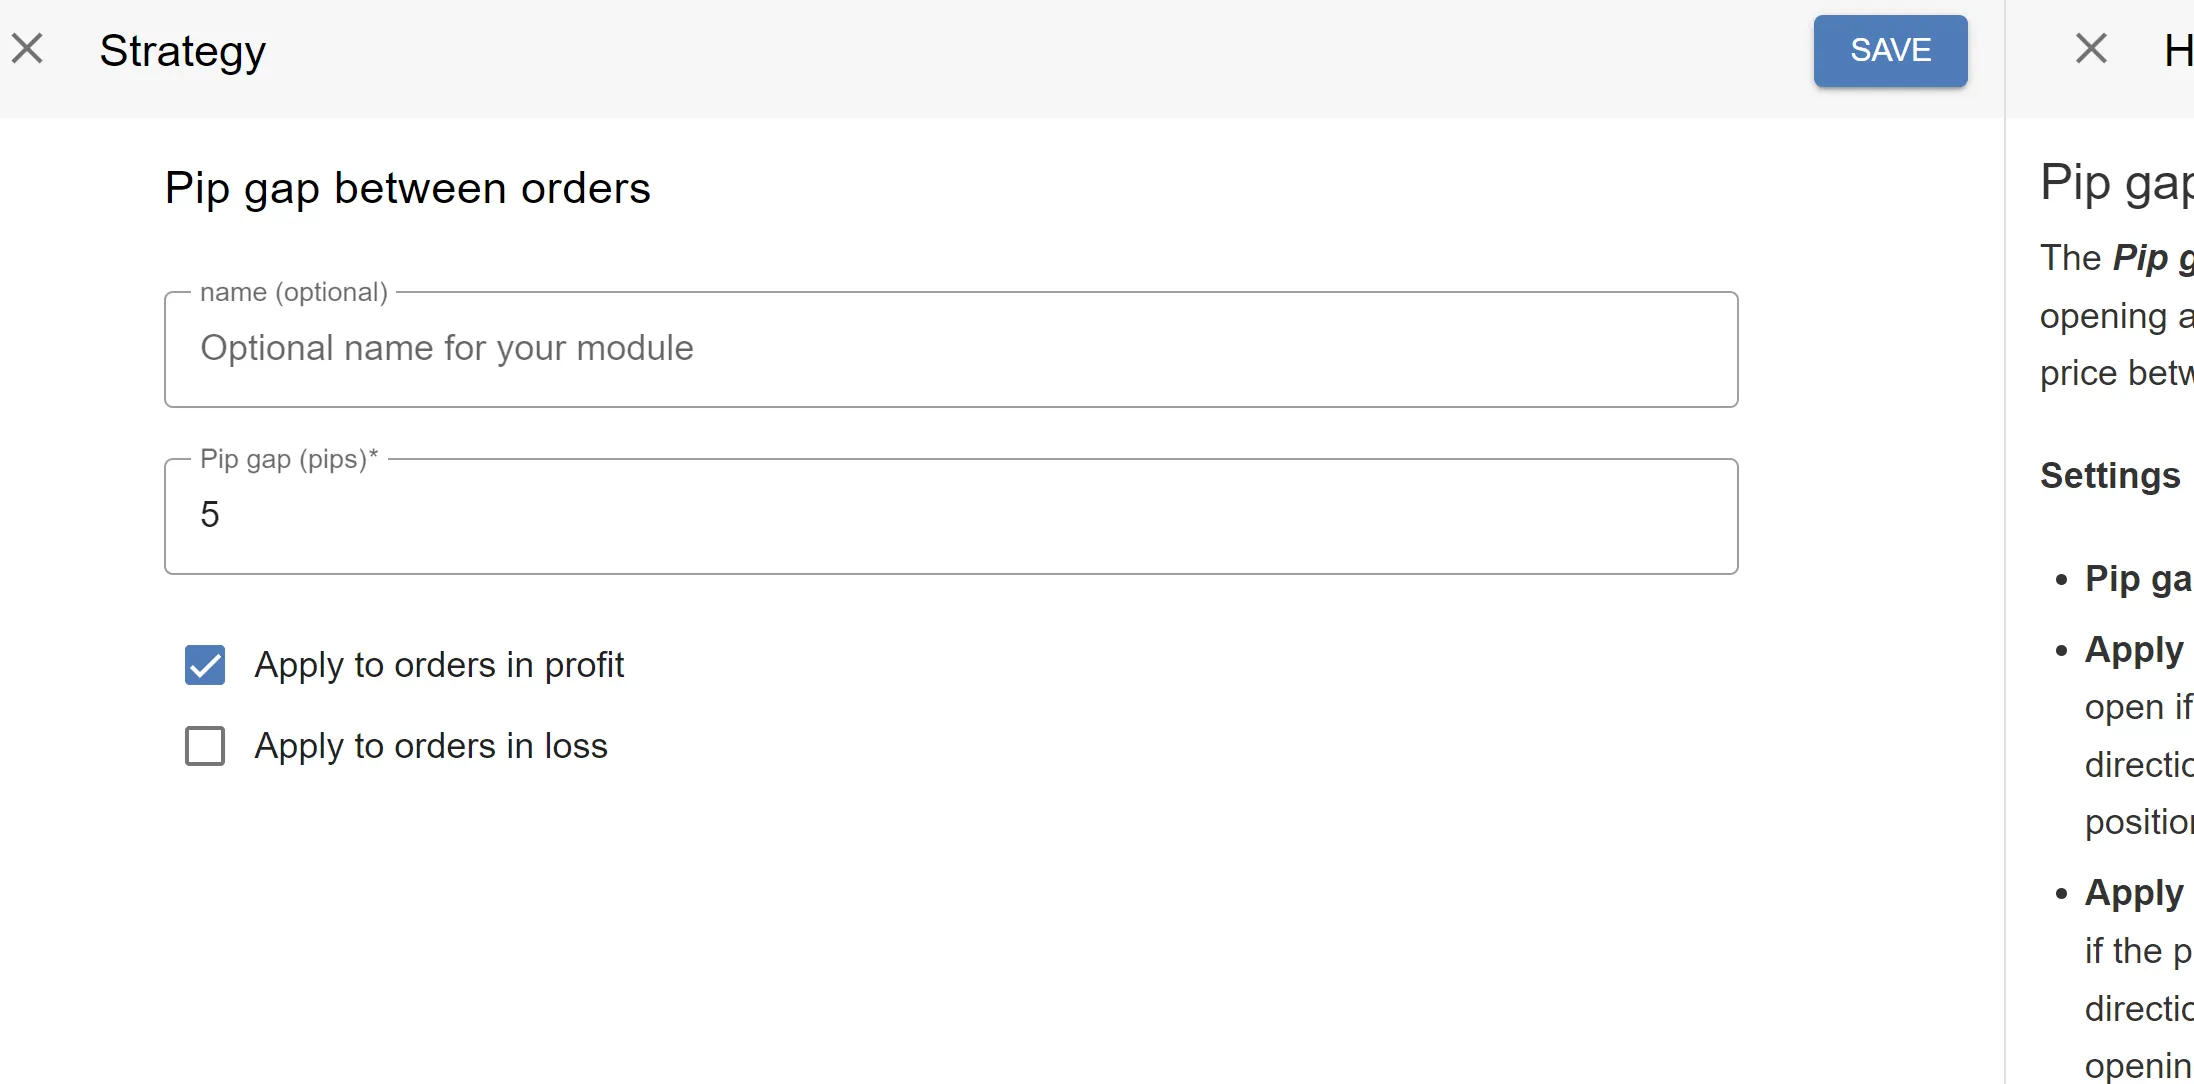
My configuration of the Pip gap module.
When to close a trade (4/4)
The final part of my EA is to close trades, which will (1) capture my profits or (2) stop my losses early, to keep losses to a minimum.
Let’s start by creating the condition for closing all my orders when the trend is moving into the other direction, so the bar closes in the other direction of the SMA 34 indicator. I will use the ‘Close Buy’ and ‘Close Sell’ signal for that.
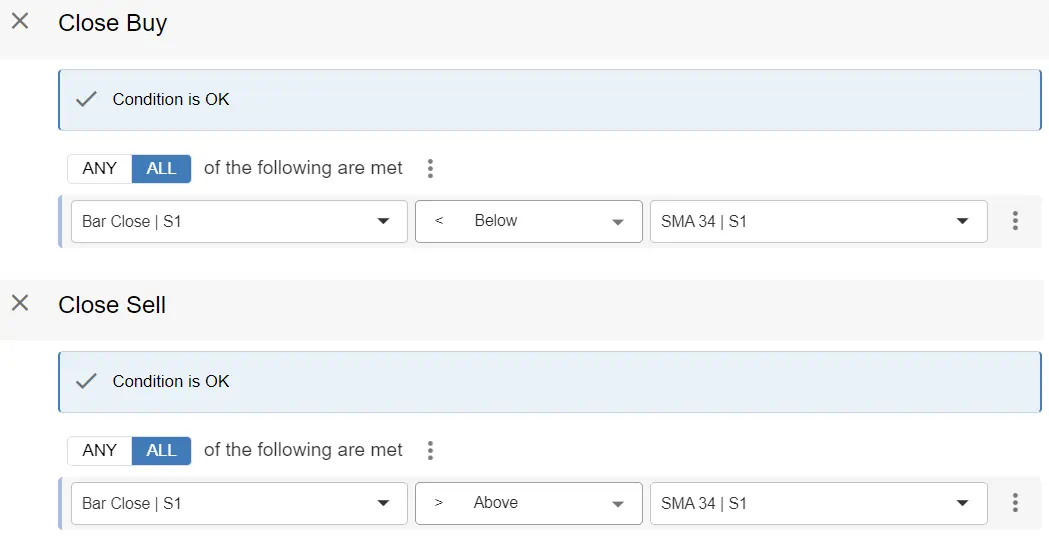
As you can see the close signals only contain 1 condition each. If the previous bar (shift 1) closes in the opposite direction of the current trend, all orders will close. It’s as simple as that.
The last close condition is a stop loss which is at the previous swing High/ low. Because I want to capture the value of the most recent swing the moment the order is opened (or within 60 seconds of the order opening as you’ll notice in a bit) and the value not to be re-evaluated on every bar, I’m adding the ‘Stop Loss – Conditional (Pro)’ module to set the stop loss. I will now again display the configuration for the module and explain every part/ line.
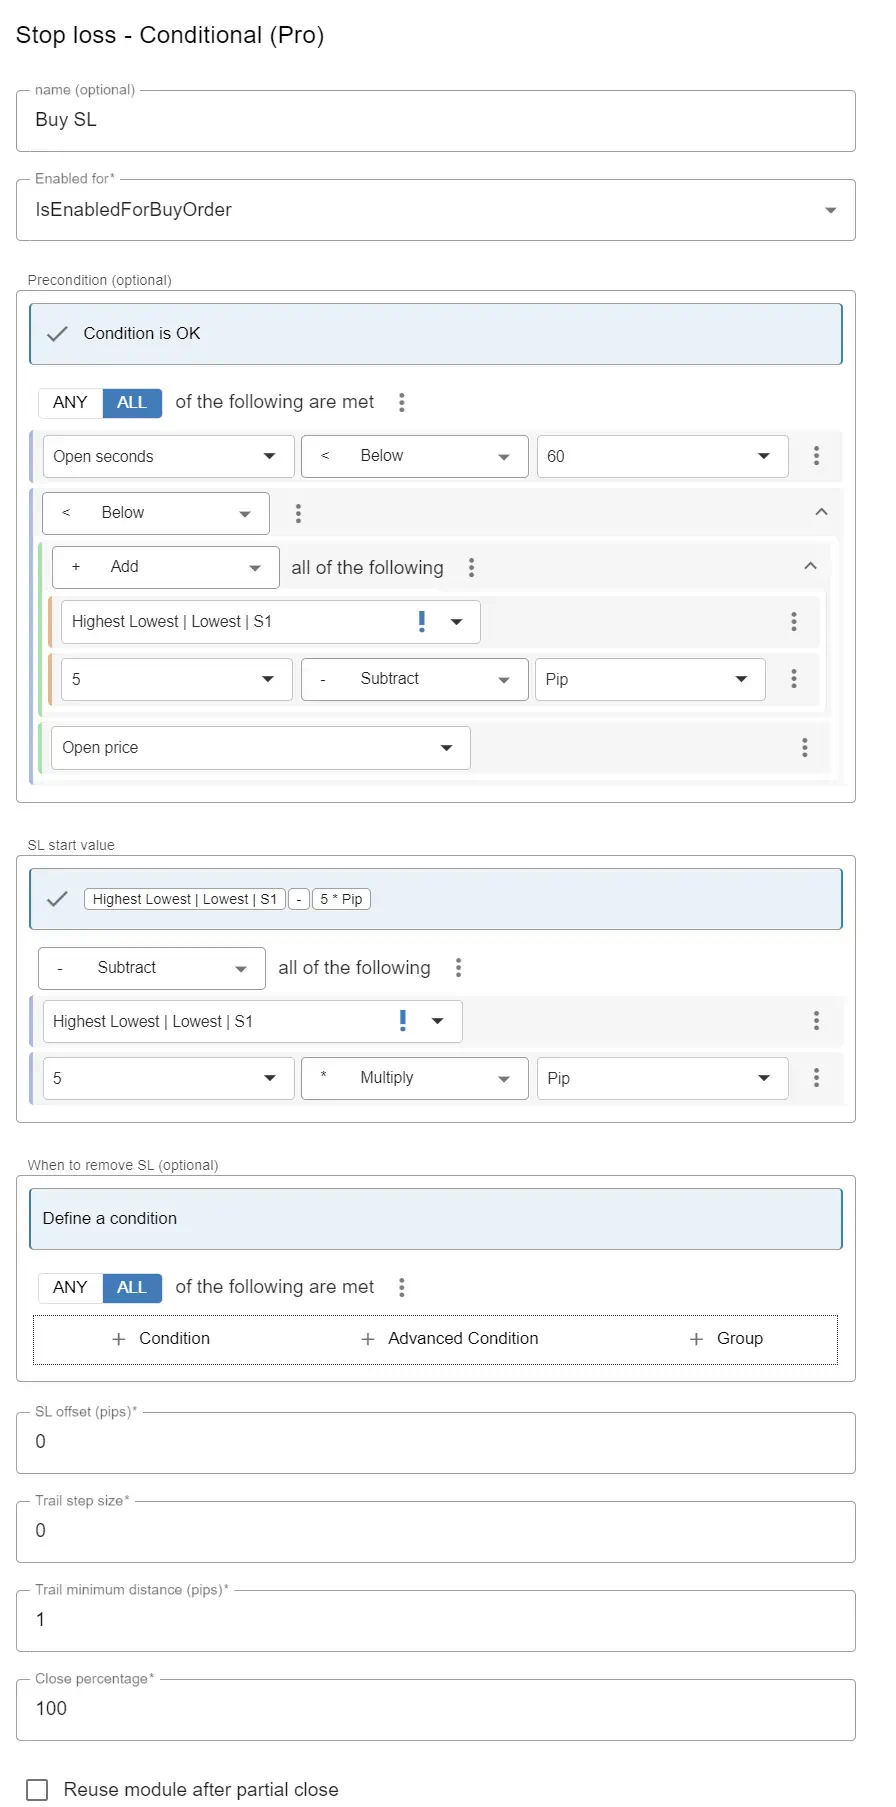
The stop loss module for buy orders.
The first part of the module is the ‘name’ setting, it’s just a reference name for me so that I know which module is which. It’s the buy order’s SL module, so I called it ‘Buy SL’.
The second part is a setting to tell the EA for which type of orders the module has to be evaluated, so I set it to Buy, since I’ll want slightly different settings for sell orders.
The third part is the condition which has to be true before the value (the price) of SL has to be decided.
- The first line makes sure the value of a swing is only evaluated in the first 60 seconds. I don’t want the value of a swing to happen much later, because this may cause the the SL to be at a completely different price point.
- The second line makes sure that the distance between the swing low is at least 5 pips away from the current price. If it isn’t, the SL will not be set and we will rely on the Close buy signal alone. So if the Swing low + 5 pips is smaller (<) than the open price, I know that the distance is at least 5 pips.
The next part is the value of the SL, so the price where the red SL line will be displayed. It will be set to the swing low – 5 pips, to allow for some space for the trend to settle.
The next part aren’t very important to me right now, but I’ll make sure the ‘Trail step size’ is set to 0, because I don’t want the SL to trail our price.
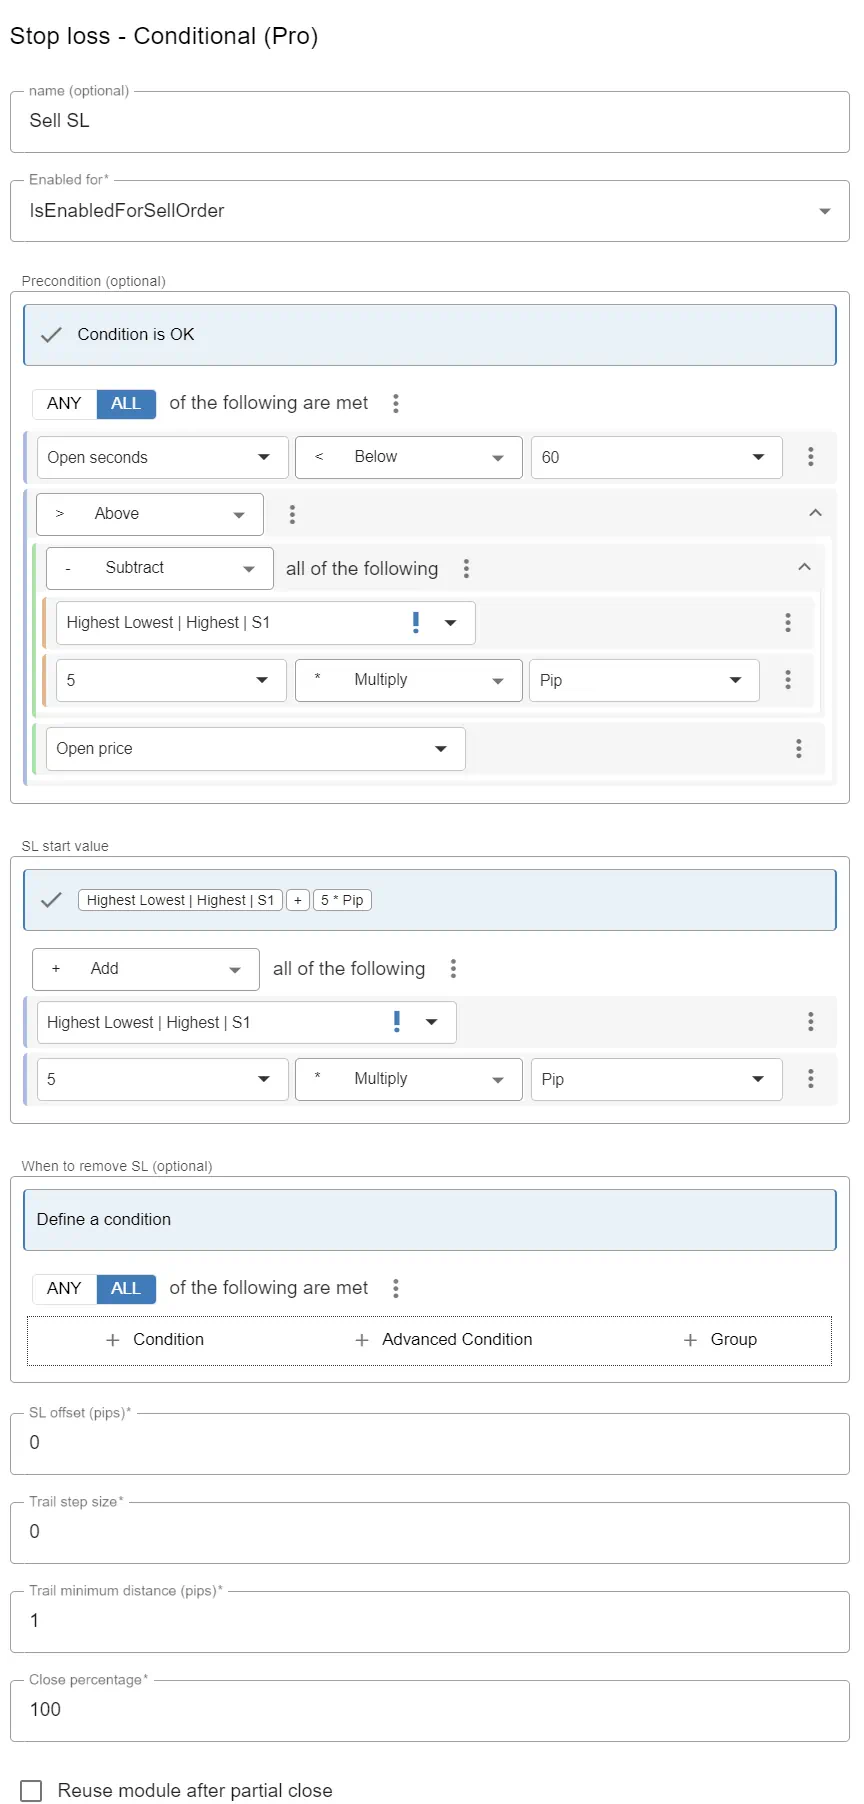
The stop loss module for the Sell orders are very similar. I won’t discuss it into detail, but here it is:
Downloading the EA
That’s it, in this blog I told you every step you need from getting from a trading system or a trading idea all the way to a working EA. I’m using this EA to trade the high timeframes (H4/ D1) on pairs which recently trended a lot and I’m mostly using the Minors for that.
I’ve discussed offering this EA to you for free beforehand to supplement my blog and the kind people who run EA Builder Pro have agreed and they will allow you to add the EA to your account by offering this EA as a template, which you can choose when adding an EA to your (free) account.
Here’s the EA in the list of template EA’s:
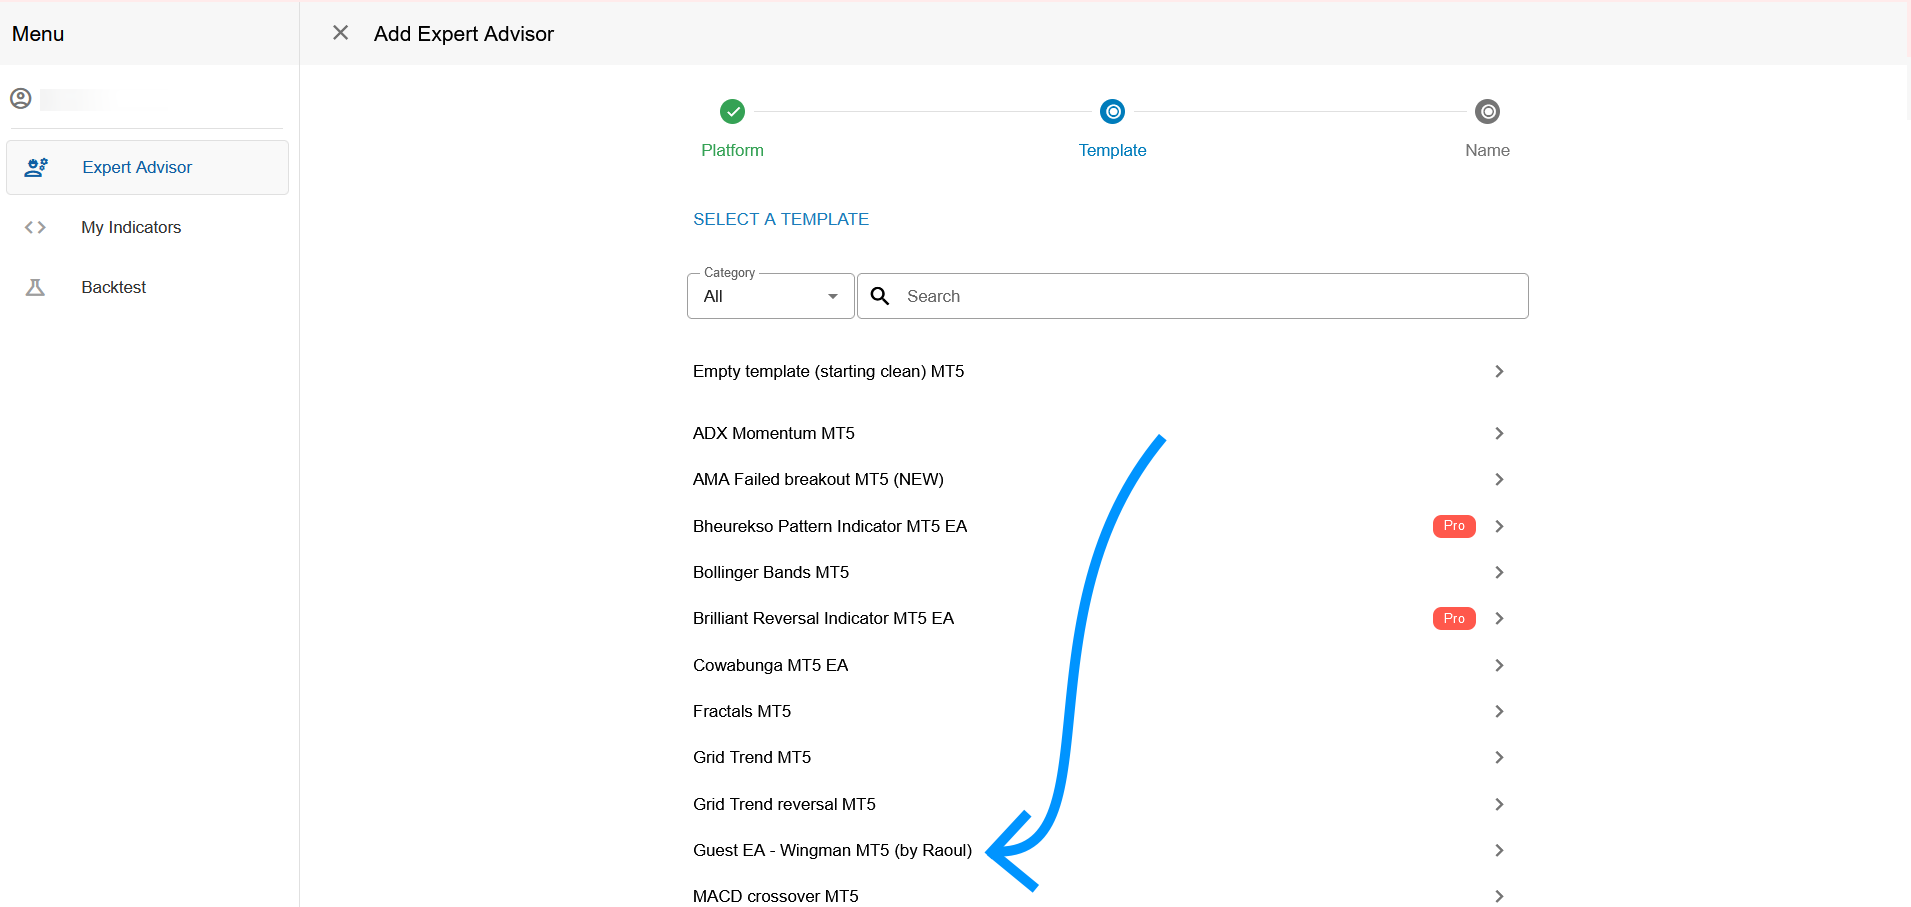
Don’t forget to put the Highest Lowest indicator in your Indicators folder before you run the EA.
How to proceed
Please make sure you don’t run the EA on choppy periods, where the price channel is moving sideways. Stay out between the top and bottom range of those channels. I’ll be spending time on future iterations on how to fine tune the EA with two things I’ll want to improve on, which are now mainly done manually:
- Set my SL to more favorable positions when many orders are opened, to safeguard profits.
- Like I mentioned a moment ago, to add protection to horizontal zigzag channels.
You can download the EA for free, but if you subscribe to EA Builder Pro’s services you’ll be able to export the EA with inputs, which will help you optimize the EA, if this is what you require. For more info, see their pricing page.